Scouting is the foundation of consistent success. Hunters who invest time learning the landscape before they hunt fill tags more often than those who show up cold on opening day. This guide gives you a simple framework that works for most species and regions, whether you are hunting public timber in the East or open basins in the West.
Start with maps
Before you set foot in the field, spend time with maps. The goal is to identify the four things every game animal needs: food, water, cover, and travel corridors between them. You can eliminate large amounts of unproductive ground from your truck or kitchen table, which saves days of walking.
Start with a topographic map. Look for terrain features that funnel movement. Saddles between ridges, benches on steep hillsides, creek crossings, and inside corners where timber meets open ground all concentrate animal travel. Ridgelines serve as travel highways for elk and deer. Draws and drainages collect water and thick cover, making them natural bedding zones.
Digital mapping tools
Several free and paid platforms make map scouting accessible. OnX Hunt and HuntStand overlay property boundaries, public land designations, and aerial imagery on topo maps. Google Earth lets you switch between satellite and terrain views to spot openings, water, and vegetation changes. The USGS National Map viewer provides detailed topographic data at no cost.1
Download offline maps before every trip. Cell service is unreliable in most hunting areas, and losing navigation in unfamiliar country creates a safety problem. Mark your access points, parking locations, and any features you want to investigate on the ground.
What to mark on your map
- Food sources: Agricultural fields, oak flats, meadows, south-facing slopes with early green-up
- Water: Springs, stock tanks, creek crossings, beaver ponds
- Bedding cover: North-facing slopes with thick timber, brushy draws, benches below ridgelines
- Funnels: Saddles, narrow strips of cover between open areas, fence crossings, creek bottoms
- Access points: Trailheads, parking areas, gates, and alternative entry routes

Look for the right sign
Once you are on the ground, sign tells you what animals are doing and where they are spending time. Not all sign is equal. Fresh sign in the right location is far more valuable than old sign in a convenient spot. Learning to read sign accurately takes practice, but the basics are straightforward.
Tracks and trails
Tracks reveal species, direction of travel, and relative age. A sharp-edged track in moist soil is recent. A track with crumbled edges or debris in the impression is older. Pay attention to track size and depth. Larger, deeper tracks in deer country may indicate a mature buck. Trails worn into the soil suggest consistent, repeated use rather than a one-time crossing.
Follow trails to learn where animals are moving between bedding and feeding. A well-worn trail between thick cover and an oak flat is a high-value setup location. Single sets of tracks crossing open ground in random directions are less useful.
Rubs, scrapes, and wallows
For deer hunters, rubs and scrapes are key pre-rut and rut indicators. Rubs on larger trees generally indicate bigger bucks. A rub line, where multiple rubs appear along a travel route, reveals a buck’s preferred path. Scrapes, particularly those under overhanging licking branches, serve as communication hubs and are worth monitoring.
Elk hunters should look for wallows, which are muddy depressions where bulls roll during the rut. Fresh wallows that smell strongly and show recent disturbance mean bulls are active in the area. Rubbed trees and torn-up saplings along timber edges also indicate bull activity.
Droppings and feeding sign
Fresh droppings are dark, moist, and glossy. As they age, they dry out and lose color. Clustered pellet groups often indicate a bedding area, while scattered droppings along a trail confirm regular travel. Browse lines on shrubs, nipped-off forbs, and torn grass all point to feeding areas. In agricultural country, look for tracks and trails entering crop fields at specific points.
Feathers and other bird sign
Turkey hunters should look for feathers, scratching in leaf litter, dusting bowls in dry soil, and droppings. Turkey droppings indicate sex: J-shaped droppings are from toms, while rounded droppings are from hens. Roost trees near water with droppings and feathers beneath them are reliable morning setup locations.
Time your scouting
When you scout matters almost as much as where. Poorly timed scouting can educate animals and push them out of an area before the season opens. The goal is to gather the most information with the least disturbance.
Pre-season scouting
Pre-season is your window to cover ground aggressively. Walk trails, check water sources, set cameras, and learn the terrain without worrying about spooking animals out of your hunting area. In most cases, animals disturbed weeks before the season will settle back into their patterns.
For deer, the best pre-season scouting window is late summer, when bucks are still in bachelor groups and feeding in predictable patterns on agricultural fields and food plots. Late summer velvet bucks are often visible at dawn and dusk, and you can pattern them with optics from a distance.
For elk, pre-season scouting in August helps you locate herds, identify water sources, and find wallows before the September bugle season. Pay attention to where elk are feeding in the evening and where they retreat into timber in the morning.
In-season scouting
Once the season opens, shift to low-impact methods. Use optics from a distance rather than walking through bedding areas. Check trail cameras without lingering. Approach from downwind and avoid leaving scent on trails you plan to hunt.
In-season scouting is about confirming patterns and adjusting to changes. Food sources shift as crops are harvested, acorns drop, or frost kills vegetation. Animals respond to hunting pressure by changing movement times and routes. Stay flexible and update your plan as conditions change.
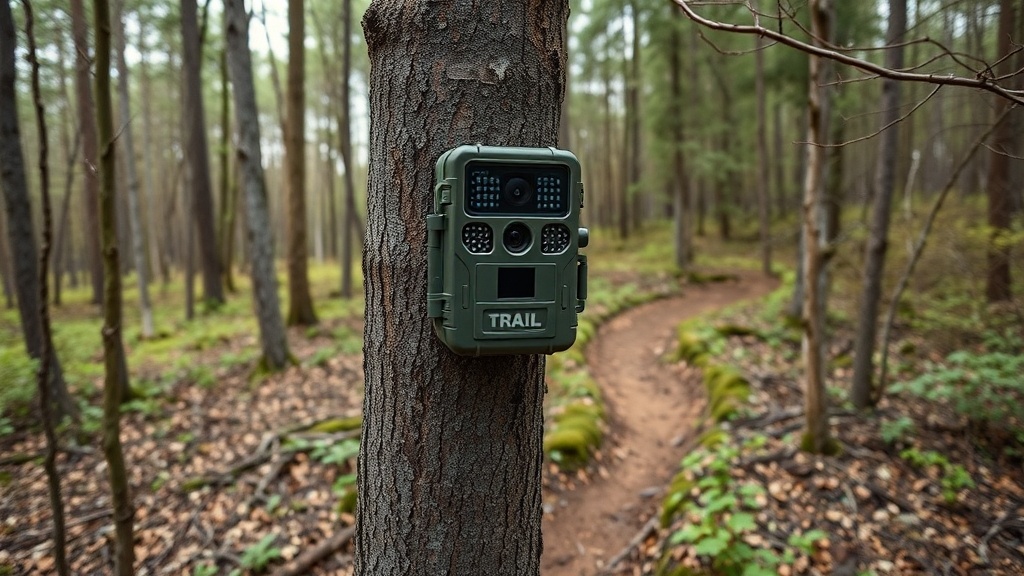
Use trail cameras strategically
Trail cameras are one of the most efficient scouting tools available. A single camera running for two weeks captures movement data you could never gather in person. But placement matters more than the number of cameras you deploy.
Where to place cameras
Set cameras on trails leading to water, scrapes, field edges, and funnels. Point cameras north or south to avoid sun glare at dawn and dusk. Mount them at the correct height for your target species, roughly 18 to 24 inches for deer and turkey, and 30 to 36 inches for elk. Clear vegetation in front of the sensor to prevent false triggers.
Camera management
Check cameras on a schedule that minimizes disturbance. Every two weeks is a reasonable interval for most situations. Use scent-free gloves when handling cameras and SD cards. Review images at home rather than standing at the camera location scrolling through photos.
Many states have regulations regarding trail camera use on public land. Some states prohibit cameras entirely on public ground, while others restrict transmitting or cellular cameras during certain seasons. Check your state wildlife agency’s regulations before deploying cameras.2
Use glassing points when possible
If the terrain allows, use a high point to observe early and late movement. Glassing is the most efficient scouting method in open and semi-open country because it covers vast areas without disturbing animals. Western hunters rely on it heavily, but it works anywhere you can see at distance.
Equipment for glassing
A quality pair of 10x42 binoculars handles most glassing situations. For open country where you need to evaluate animals at long range, a 15-45x spotting scope on a tripod is essential. Compact tripods work for glassing from a pack, but a full-size tripod is more stable for extended sessions.
Glassing technique
Pick a vantage point with a wide field of view and settle in before first light. Systematically scan the landscape in a grid pattern rather than randomly sweeping back and forth. Start with binoculars to locate movement, then switch to a spotting scope for detail. Focus on transition zones: timber edges, field borders, shaded draws, and water sources.
Spend at least 30 to 45 minutes at each glassing point before moving. Animals often appear gradually, stepping out of cover or standing from beds. Rushing through a vantage point means missing animals that are present but not yet visible.
Track hunting pressure
On public land especially, other hunters are a variable you must account for. Pressure often moves animals more than weather or food changes. Learning to read pressure gives you an advantage over hunters who ignore it.
What to watch for
Note the number of vehicles at trailheads, boot tracks on trails, and tree stand locations. Listen for shots and note the direction. If an area gets hammered on opening weekend, the animals that survive will relocate to adjacent cover, often to steeper, thicker, or more remote terrain that most hunters avoid.
Using pressure to your advantage
Pressure is predictable. Most hunters walk less than a mile from the road and hunt the most obvious terrain features.3 By going farther or choosing less obvious locations, you put yourself where pressured animals are likely to move. Hunt the back side of ridges, the far end of drainages, or the thick cover that most people walk past.
Midweek hunts, when possible, dramatically reduce the number of people in the field. A Wednesday sit on public land often feels like a private property hunt compared to the weekend.
Keep a simple log
A scouting log turns individual observations into long-term knowledge. After two or three seasons of notes, you will have a detailed picture of how animals use your area across different conditions. This is the kind of advantage that cannot be bought.
What to record
- Date and time of every scouting trip and hunt
- Weather conditions: temperature, wind direction and speed, barometric pressure, cloud cover
- Animal sightings: species, number, sex if identifiable, location, direction of travel, time of observation
- Sign found: type, freshness, GPS coordinates or map pin
- Hunting pressure: number of vehicles, other hunters seen, shots heard
- Access notes: road conditions, gate status, trail quality, water crossings
Format
Keep it simple. A small notebook works. A notes app on your phone works. A spreadsheet works. The format matters far less than consistency. Record something after every trip, even if the note is brief. A season of “no deer seen, south wind, 45 degrees, heavy boot traffic on main trail” entries still tells you something useful when you review them the following year.
Putting it all together
Effective scouting follows a sequence. Start broad with maps, then narrow your focus with boots on the ground, and finally confirm your findings with observation and cameras. By opening day, you should have two or three specific locations identified, each chosen for a reason based on what you found during scouting. You should know how to access each spot quietly, what wind directions work for each setup, and what time of day you expect to see animals.
Scouting is not a single trip. It is an ongoing process that continues through the season and builds year after year. The hunters who consistently fill tags are rarely the luckiest. They are the ones who put in the most preparation before the hunt begins.
Helpful internal links
- Guides hub
- Best times to hunt deer
- Public land checklist
- Season planning calendar – align your scouting trips with application deadlines and season dates
- Whitetail deer hunting guide – habitat, behavior, and tactics for the most widely hunted big game species
- Elk hunting guide – western big game scouting, terrain, and season strategies
- Gear reviews – optics, boots, packs, and other equipment to support your scouting setup
Final checklist
- Confirm rules on the official state website.
- Save maps for offline use.
- Pack essentials and verify tags.
- Review safety and access rules before you leave.
USGS National Map Viewer – Free topographic and aerial imagery for the entire United States. ↩︎
Trail camera regulations vary widely by state. For example, Arizona prohibits all trail cameras for taking wildlife, while other states only restrict cellular or transmitting cameras on public land. Always check your state wildlife agency’s current regulations before use. ↩︎
Lyon, L.J., and A.G. Christensen. “A Partial Glossary of Elk Management Terms.” USDA Forest Service General Technical Report INT-288. Research on elk hunter distribution consistently shows the majority of foot traffic concentrates within one mile of road access. ↩︎
Explore Related Topics:
Notice an update we should make?
We strive for accuracy. Contact us here if you see incorrect or outdated info on this page.